The acrylic nails are used to express the personality of an individual, it is more like a fashion statement. The acrylic nails are a strong material that won’t easily be chipped and light as if it was nothing. The acrylic nail is made out of acrylic glass that is mixed up with another substance that is called liquid monomer that enabling the whole mixer as malleable. This liquid monomer and acrylic substance enables the acrylic nails to be bendable, but won’t break or crack.
When wearing acrylic nails with ease, removing those had a lot of questions on how they would come off. The acrylic nails could stay on the nails for as long as it is still attached, even if the natural nails grow off. The adhesive that came from the acrylic nail product ensures the stickiness is enough to last for a long time in all types of weather. There are ways to completely remove acrylic nails without damaging the nails. Ensure proper safety, as it is manageable from everywhere, but the proper handling of the chemical solutions and tools should always be considered. Acetone is a highly flammable chemical, just be aware that while the below procedure is done, there shouldn’t be any fire starters that are present around, including cigarettes.
Listed below are 10 uncomplicated steps on how to remove acrylics without Damaging Your Nails.
- Remove any surplus acrylics with care.
- Trim your acrylics as near as your natural nails.
- Rough up the polish's surface with a nail buffer until the gloss is totally gone.
- Fill a tray or bowl with 100 percent pure acetone.
- Soak your nails in it for five minutes.
- Gently remove the polish off your nails with a metal cuticle pusher, pushing downward from your cuticles.
- Redip your nails for five minutes, then gently push them again.
- Repeat the process until the acrylics fall off.
- Remove the smaller pieces using a nail buffer.
- Put cuticle oil on your nails to nourish and hydrate it.
1. Remove any surplus acrylics with care.

There are a long of fashion acrylic nails that are available in cosmetic stores, there are also personalized acrylic nails that come with beads or crystals. When trying to remove the acrylic nails, these design materials attached to the acrylic nails would hinder the removal or make it hard to remove the acrylic nails completely. In order to prepare for the steps of removing acrylic nails, removing surplus materials like the crystal beads and other design that is on top of the acrylic nails. This enables the acrylic nails to be more workable and for the next step done without unnecessary steps to repeat. The removed designs or crystal beads can be reused for the new acrylic nails that why them is necessary to remove them before doing the removal steps.
2. Trim your acrylics as near as your natural nails.

Acrylic nails can be trimmed using a nail cutter. The purpose of trimming the acrylic nails is for the nails to be soaked properly in the bowl in preparation for the next procedure. The trimming would also enable the tools to have easy access to the points that need movements to gently raise the acrylic nails against the natural nails. The trim should be as near as the natural nails, but not totally of the same level as the acrylic nails. The purpose of this is to determine where the joint of the acrylic and natural nails are, and in order for the nail pusher to have leverage when pushing it out.
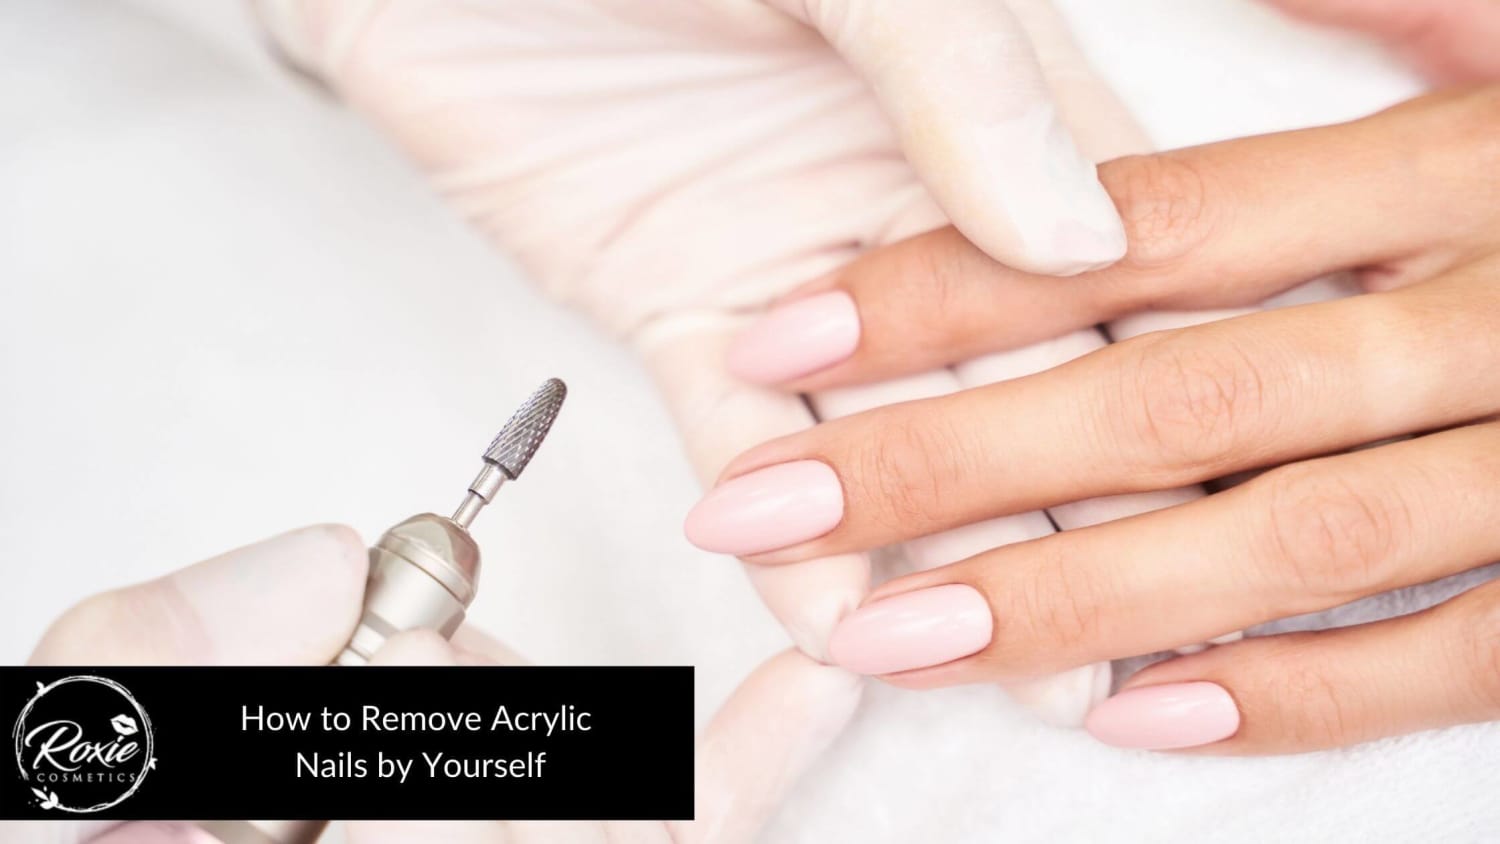
3. Rough up the polish's surface with a nail buffer until the gloss is totally gone.

The next procedure is to rough up the nails with a buffer until the gloss of the acrylic nail will be removed. A nail buffer is a type of tool particularly used for nail cosmetic applications, some buffers have 2 surfaces that have different outputs. The smoother side of the buffer enables the nails to be fine and smooth, while the other side is rougher to rough up the nails or make it thinner. The roughing-up process of the nails enables the acrylic nails to be thinner and enables the solutions to penetrate or soften the acrylic material for easy removal. The paint on top of the acrylic nails makes it hard for the liquid solutions to soften up the acrylic nails.
4. Fill a tray or bowl with 100 percent pure acetone.

Get a good size bowl for the right amount of pure acetone to be used. The previous procedure earlier was to trim the nails close to the level of the natural nails, this is also a good practice to use a rightful amount of pure acetone. If the nails are long, the amount of acetone will be much higher than with trimmed acrylic nails. The 100 percent pure acetone is widely used for cosmetic applications. A good amount of pure best acetone brand is good to let the acrylic material be flexible and easy to remove.
5. Soak your nails in it for five minutes.

The acrylic nails are trimmed and buffed, get ready to soak those fingers just a little above the nails. The five-minute time interval lets the solutions penetrate the acrylics substance and may soften and dissolve the adhesive components. The solution is safe for the skin as long as there is no open wound that might irritate or cause a lot of pain when absorbing the pure acetone. This procedure is commonly practised by nail professionals, and it could be done even at home with proper safe steps.
6. Gently remove the polish off your nails with a metal cuticle pusher, pushing downward from your cuticles.

After a 5-minute soak, gently remove the acrylic nails using a metal cuticle pusher to push down the acrylic nails. The metal cuticle pusher is designed for nail applications and removing ingrown nails, it is a metal stick form that is made from surgical steel that is safe for the application. There are instances that on the first try the acrylic nails will come off and some would still remain intact depending on the brand adhesive quality that has the strength to last for daily use. If the first application of soaking is unable to remove the acrylic nails easily, redoing the soaking process is advised.
7. Redip your nails for five minutes, then gently push them again.

When the first 5-minute soaking was unable to remove the acrylic nails of the natural nails, redipping the nails for another 5 minutes is advised. There are some acrylic nail products that have a tougher acrylic structure, which means that the quality is very good, and the adhesive is very tough to remove. Letting another 5 minutes softens the acrylic material and will still be safe for the skin as long as there are no open wounds.
8. Repeat the process until the acrylics fall off.

During the process of removing the acrylic nails after soaking, this may be repeatedly done until all the large pieces of the acrylic nails fall off. This technique is done while the acrylic nails are still soft, the process would be a lot easier and safe to avoid injury. The repeating procedure only applies for only the nails that still have acrylic nails attached. During removal, there are smaller pieces or parts that might still attach and might need a more thorough buffing to remove it completely.
9. Remove the smaller pieces using a nail buffer.

The acrylic part will not come easily, especially for tougher brands that promise long-lasting use. To remove the smaller piece, a nail buffer can be used to completely rub it off from the natural nails. In this process, the natural nails might be scuffed off during the buffing of the smaller pieces. Do not use the metal cuticle pusher as it may cause a deep scratch if not controlled properly. When the smaller acrylic pieces are completely buffed, use the fine best nail buffer in all the nails before jumping into the next procedure.
10. Put cuticle oil on your nails to nourish and hydrate them.

Before proceeding to this step, make sure that the nails are completely fine buffed, and polished. After a rough removal of the acrylic nails and their adhesive, the nails should be cleaned and prepared for the application of cuticle oil. The process of putting a cuticle oil is just plain and simple. The cuticle oil is a moisturising product that helps the nails from being dry. The cuticle oil products are mostly made from natural ingredients like vegetable oils, it may contain citric acid and vitamins. It can protect the health of the nails from harsh chemical solutions, heat, cold, and other elements that may harm the health of the nails.
What are the other ways to remove acrylics without damaging nails?
There are a lot of ways to remove nail extensions or acrylic nails, but the use of acetone really remains the primary substance to complete the removal procedure. Trimming the nail extension or acrylic nails is also necessary before starting the process, this enables the soaking and buffing easier to work out.
Listed below is the other procedure that won’t damage the nails.
- Trimming the acrylic nail extension: The trimming of excess acrylic nails is essential in order to easily work out the preceding instructions.
- Soaking with acetone: The soaking enables the acrylic nails to soften and easily detached from the natural nails. The acetone should be 100 percent pure, as it has the ability to deform the structural integrity of an acrylic material when soaked.
- Use dental floss for removal: This technique is used for removing car accessories that are stuck with all-weather adhesive tape. This technique will help remove the acrylic nail piece as a whole. This procedure takes two persons to do it, the one who manages the dental floss and the other is the one who wears the acrylic nails that control it. The advantage of this method is that there will be no left to buff else, just some sticky adhesives.
- Buff the excess acrylic material: There are still left materials that won’t come off, lately due to softening acrylic nails, it would tear and leave on the nails. Buffing would remove excess sticky materials off the nails eventually. Avoid over buffing as it would include the natural nails. Ensure proper grit of buff should be used, fine buff should be the one.
- Hydrate the nails: Using the best cuticle oil is an essential substance to make the nails look healthy and moisturise. This last step is important because, during the soaking of acetone, the nails will get dry and might get brittle if exposed to heat and dry weather.
Does removing acrylics hard?
The removal of acrylic is not as hard as it looks, there are more individuals that apply the procedures in the comfort of their homes. The tools and materials are available in drug stores and marts. While doing the procedures of removing the acrylic nails, it can be done with the assistance of another person or just by an individual, it can be manageable.
Is using acrylics damage your nails?
No, It won’t damage the nails, as long the process of removal is properly executed. The acrylic nails as attached with nails benefit the nails because it is protected from the heat of the sun as it is indirectly absorbing the UV rays, it is also not prone to scuff or scratch. The acrylic nails are part of the Women's fashion statement and reflect their personality.